Step 6a – Install Nail Stakes and Rebar

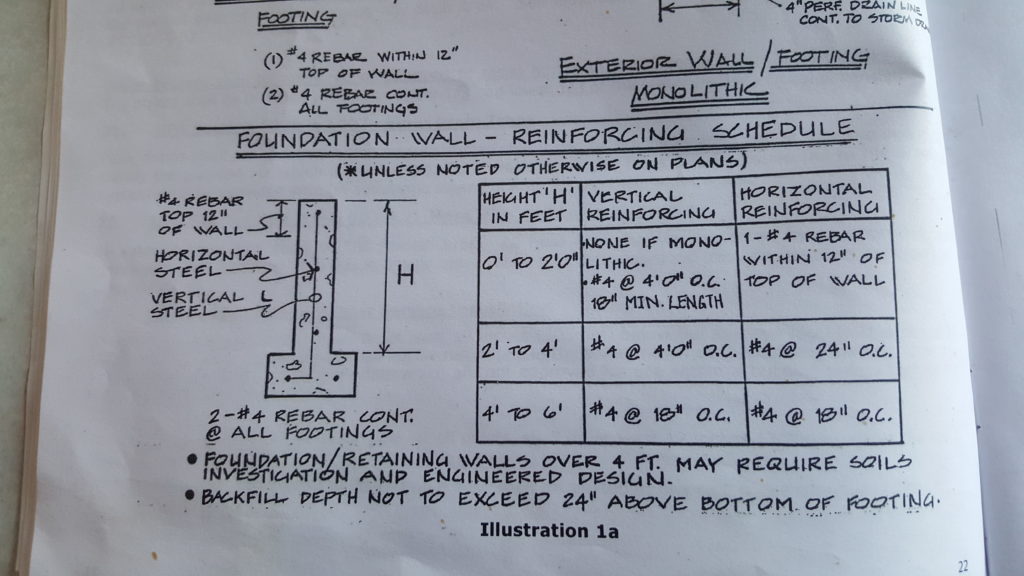
Building a strong foundation is one of the most critical parts of building your own home, and concrete is the best material for the job. Concrete can withstand an incredible amount of force when it is compressed, but doesn’t do as well when it experiences tension forces. Steel reinforcement (rebar) embedded in the concrete helps give it more tensile strength. My county building codes require two runs of horizontal rebar at the bottom of the footings and one horizontal run within the top 12″ of the stem wall. These requirements are very clearly spelled out with some pictures on the county website. The three horizontal runs must be connected by L-shaped vertical rebar every 4 feet, alternating direction between the two bottom rows of horizontal rebar.

One of the more difficult aspects of installing rebar is ensuring that it is embedded inside the concrete (most codes require 3″) as opposed to just lying on top of it or underneath it. I will be using small blocks called dobies to hold the rebar up so that when the concrete is poured over it they will stay the required 3″ off the ground. The vertical rebar is held upright by tying it to the bottom runs using rebar tie wire. To make things easier, I bought a neat little tool for $15 that quickly and neatly twists the tie wires together for you as you pull on the handle.

Rebar comes in lengths up to 20′ so when you need a longer run than that you need to splice two or more pieces together. These splices must not occur in exactly the same spots on each run and must be 50 bar diameters in length. Since I am using #4 rebar, the diameter is 4/8 or 1/2″ (#5 rebar would be 5/8″ in diameter, etc.) If we multiply that by 50 we get 25″ so the spliced rebar must overlap by at least that length. I had already used Rhino to figure out exactly where I wanted these splices so it was simply a matter of cutting them, bending them, and using the rebar tie tool to attach them together.

I noticed that one of my Point Roberts neighbors had an old rusty rebar bender/cutter in his yard and asked him if I could borrow it for a week. It was barely holding itself together and at least twice as hard to operate as a newer one, but it did the job and saved me the money it would have cost to rent one. The two notches on the front work together to shear the bar in two, and the knobs on the side work together to form a 90 degree bend in the rebar. I put the stakes to hold the form work in first to ensure that the rebar wouldn’t be blocking me from putting them in just the right place.

Then I installed the rebar before hanging the form boards up so I wouldn’t have to work around them. I installed the top row and then the vertical sections first.

You can see above how the alternating vertical rebar join together the two bottom horizontal runs and the top horizontal run. Once the forms are hung on the stakes, I will use some more rebar tie wire to straighten out the runs a bit so they don’t sag and wave so much.
Advice? Questions? I'd love to hear your feedback or help you out in any way I can!