Step 11d – Inspection, Bargeboard, and Gable Overhangs

I’m tantalizingly close to reaching that glorious step where rain will no longer be able to harm the OSB roof sheathing or subfloor but a few key steps remain. Most importantly, there is currently no roof sheathing on the gable end overhangs. As you can see in the pictures, I only installed the sheathing up to the gable end trusses instead of extending it out to the ends of the lookouts, which is where the roof will eventually end. The reason for this is that the bottom of the gable end overhang sheathing is going to be visible from below, and the OSB I used for roof sheathing 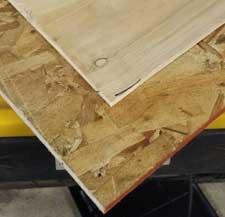 has a very cheap look to it and can tend to flake off when exposed to the elements. Plywood looks ten times better and will hold up much better to the elements, so it’s worth making the transition from the OSB to plywood just for those gable end overhangs. This part of the roof isn’t structural however, so it wasn’t part of the roof sheathing inspection I passed yesterday. The plywood is only to add a nice aesthetic touch.
The other item that needs to be installed before adding the roof underlay is the bargeboard. Made of the same primed, textured wood as the fascia, the bargeboard will attach to the fascia and run along the edge of the lookouts up to the ridge. Once it is in place, the roof will be entirely surrounded by this finished wood. Before nailing it on, I climbed up the roof and measured the lookouts, recording the length of the shortest lookout on each side (they varied up to 3/8″).

I grabbed what was left of the primed, textured, wood and beveled the top edge at 22.6 degrees on each side, to form the shape you see below. I also cut each piece to the length I had recorded for the side it would be attached to. I toenailed these pieces on to each end of the roof ridge, and then snapped a chalk line across the lookouts, holding one end of the line on the edge of the ridge pieces, and the other just grazing the end of the shortest lookout. This gave me a visual as to which of the lookouts needed to be trimmed just a bit so they would all be even. After cutting them down with a circular saw, I mitered one end of the bargeboard and brought it up to the roof. I eased it over the edge and lined up the top side with the tops of the lookouts, clamping it in place. Next, I marked the other end of the bargeboard where it crossed the center of the ridge piece and cut it along this line, then nailed it to the ends of the lookouts using galvanized nails (as these nails will be exposed to the elements).

With the bargeboard in place, I ripped a sheet of plywood in half the long way, and used my winch and rails to reel the two pieces up to the top of the roof. I lined one end up so it was about a 1/4″ from the edge of the bargeboard and tacked it down to the lookouts. I then ran my circular saw along the opposite edge of the plywood deep enough so it would cut through the OSB sheathing. This trimmed off about 3/4″ of the OSB sheathing, exposing half of the gable end truss to support the plywood. This was important so I would have something to nail the plywood into. I cut the second piece of plywood so it lined up over the fascia the same distance as the OSB sheathing, and then thoroughly nailed the plywood to the gable end truss, lookouts, and bargeboard.

As I’ve said before, there’s nothing quite like working on a roof when it’s a beautiful day!

Thank you for sharing this information! This really helps!