Step 3 – Temporary Power Pole
There are many reasons why I need to get some electricity running at the lot as soon as possible. It will power my tools. It will power the lights and heat in the trailer I will be living in. It will charge my phone and computer. It will even power the pump that will run the septic system. I can’t possibly get started on building my own home without it. In short, living without electricity is awful. Did you know that 1.2 billion people on this planet are without electricity? They are the dark areas in the map below. This experience has taught me to never take for granted how fortunate I am to have this powerful amenity.

So how do I get electricity rolling? First, find out which power company services your area. Luckily for me, the Puget Sound Energy company that services Point Roberts has an excellent website that lays out all the steps pretty clearly. They have very strict procedures that must be followed and they lay them out in easy to follow, step-by-step instructions. Here’s what it says….
Step 1 – Call the Construction Service office and inform them you will be installing temporary power. This allows them to prepare by ensuring the proper framework exists to provide the lot with power. This may include a line extension, adding a transformer, etc. Luckily for me I didn’t need any of these things but it was still a good thing to check and it gives them time to prepare for my permanent service, which they said may require them to add another transformer.
Step 2 – Obtain an electrical permit – According to the building department for my county, the Washington Department of Labor and Industries is in charge of issuing electrical permits. While their website wasn’t anywhere near as slick as the power company site, I was able to navigate my way through a few hiccups and eventually get my first permit!

Step 3 – Call 811 – Someone will come out to the lot and use spray paint to mark all existing underground cable locations marked to prevent digging into one of them.
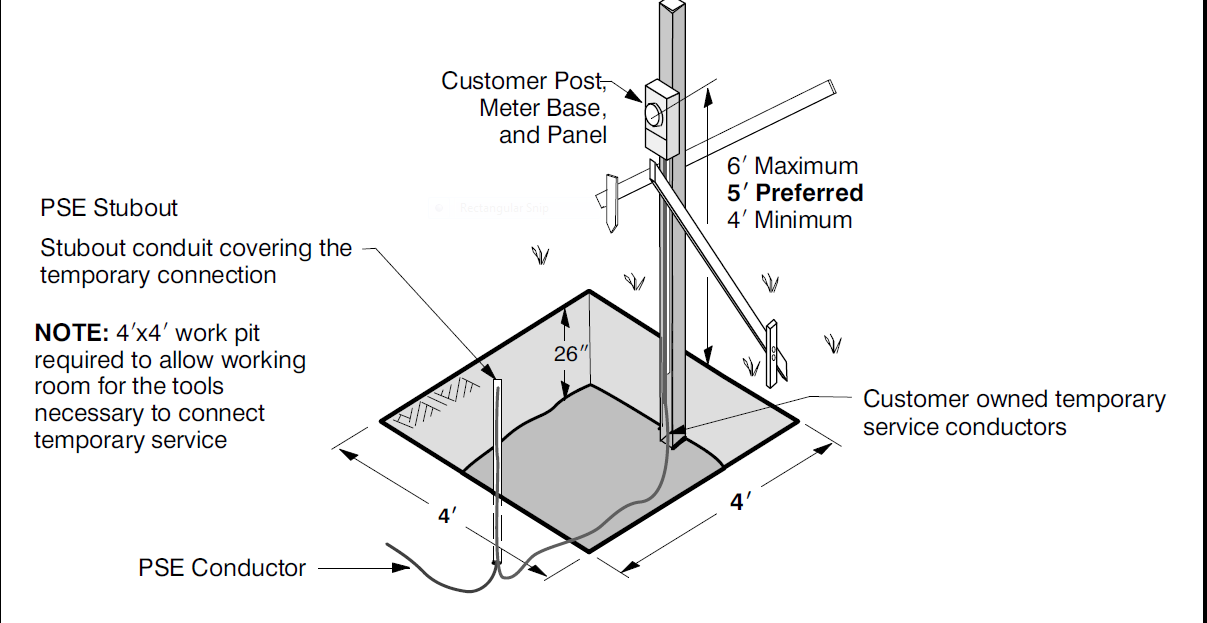
Step 4 – Install the meter base/ socket – Here’s where things get a little more fun. As you saw in the 1st picture, the power company laid out exactly how they want me to construct the meter base and install the meter socket. They even added another picture for more detail….

As I explained in the introduction, many people think this stuff is so complex and that it should be left to professionals. What they don’t know is that many of these “professionals” don’t even take the time to read the instruction manual. They simply rely on past experiences with other power companies and follow the same routine. This can result in mistakes which must be corrected, then a fee must be paid for it to be reinspected. As you can see, the instructions provided on the power company’s website are precise and crystal clear, so I’m quite confident that I can do a better job following them than someone who didn’t take the time to read through them. The first step was to tackle the blackberry vines that had invaded the 4 foot square area behind the power stubout where I would build the power pole.

I also located a meter base and a 6 circuit service entrance online at good prices. I decided on a 6 circuit because I will need one circuit for the 30 amp RV power, one for the septic pump, one for extra outlets for the RV (there are outlets in the RV that run off the 30 amp circuit but with an electric heater and plenty of electronics a little extra will be nice), one for temporary lighting inside the house when I get to working on the interior, and the last two for powering tools.
My new addition floor is like 9 inches higher than my existing floor how do you fix ghat
I don’t know of any way other than furring out the existing floor which would be a ton of work and cost, or just installing some steps.