Step 11b – Lookouts and Fascia

Two other items that need to be installed before adding the sheathing are the lookouts, fascia, and subfascia. These elements will work together to add some flair to the edge of the roof line. The lookouts run along the gable ends of the house, and will not only give a nice look to the trim, but will also support the outer edge of the roof, which will run a couple feet beyond the walls of the house. These overhangs help to keep rain away from the walls, and also provide some shade for the windows when the sun is high in the sky. 
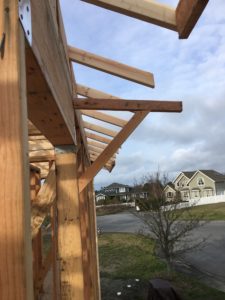
The lookouts consist of 2×6 lumber cut just under 4 feet long, and are installed like cantilevers. One end is nailed one truss inside from the gable end truss. The gable end truss is then notched so the 2×6 sits inside of it. The other end is left loose as you can see above, and will eventually attach to the bargeboard. This step is easier once the roof sheathing is on.
You should be able to visualize how the cantilever works in the picture above as all of the weight placed on the outer edge of the lookout will actually create an uplifting force on the inside truss. This force will be nicely balanced by the weight of the roof. You can also see why the lookouts need to be installed before the roof sheathing, as half of them will be covered up with the sheathing.
The subfascia attaches to the end of the truss tails. Not only will I be using it to line up the ends of the trusses and ensure they are nice and straight, I will also use it as a support for the fascia, which I will describe next, and to provide nailing for the soffit, which won’t be added until a few more months in the build have passed. Like the frieze blocks, the top of the subfascia is beveled to match the slope of the roof.
Straightening the trusses out sometimes requires a significant amount of force, Imagine yourself 20 feet up in the air, leaning out over the edge of the wall, trying to hold an 8 pound nailgun with one hand and applying a ton of force with the other hand… Not a pretty thought, is it? Clamps give me an extra pair of hands so I don’t need to put myself in those kinds of positions. Above you can see how I used two of them – one to move the truss slightly horizontally and another to move it vertically.
 A couple makeshift brackets help support the subfascia while I’m getting it ready to nail in. The main part of it was a 20 foot long 2×6 board, which weighs in at close to 50lbs. It isn’t something you really want to carry up a 20 foot ladder! With the brackets, I was able to pull the board up through the trusses and then ease it over the edge of the truss tails until it was lying on the brackets. Then I would climb up the ladder to nail it in. Once I was finished I pulled out the nails holding the bracket to the wall and set it to the side until the next time I need it.
The final step before attaching the sheathing is the fascia. The fascia is pre-primed and textured since it is one of the first pieces we are adding to the house that will still be visible when construction is completed. As you can see, it attaches directly to the subfascia.
Just like the previous parts I described, the top of the fascia is beveled to match the slope of the roof. The edge of the roof sheathing will sit on top of the fascia. When the gutters are added, they will run around the fascia and partially conceal it.


I have a set of trusses delivered for my garage project next week so I reviewing the sequence for setting the trusses and sheeting the roof. I really appreciae that you took the time for this detailed writeup/site.
Thanks
That’s awesome! Rolling trusses has got to be one of the most exhilarating parts of the build. Enjoy it!