Step 13 – The DWV

Now that the frame of the house is complete and safe from the elements, there stops being a necessary order of doing things. I could, for instance, decide to finish the exterior of the house, put the shingles on, run electrical wire, or install the ductwork. There really isn’t anything to hold me back from working on any of those things. I decided that the most intelligent thing to do would be to finish installing the roof as soon as possible whenever I had some decent weather, and when it was  too wet to be on the roof I will work on the plumbing. The DWV system really needs to be done first because there are 3 vent pipes that will penetrate the roof, so I want to have those installed before putting the shingles on. The only other roof penetration will be the Soladeck (pictured at left) for the solar array electrical connection.
DWV stands for drain, waste, vent, and is one of two systems that make up the plumbing of the house, the other one being the water supply system. The job of the DWV system is to remove water from any plumbing fixtures in the house (drain), transport it to the septic system (waste) and ensure that air pressure doesn’t interfere with the process (vent). Most people have a pretty good sense of how the first two parts work, but are completely oblivious to the operation of the last one. An easy way to explain it is to think back to when you were a kid playing with a drinking straw, holding your finger over one end to make the water magically defy gravity. The venting part of the DWV system is the equivalent of removing your finger from the end of the straw to allow the water to slide out. Without it, all of the pipes installed to drain and waste would be completely ineffective. In fact, best practices allow for each individual fixture to have a vent of its own. Some of these vents are eventually combined together until they exit out of the roof.
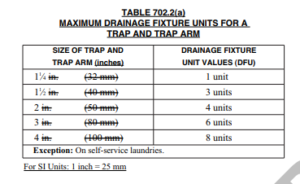
The first part of the planning process involves deciding how many and which type of plumbing fixtures you will have in your house. Next, you will use the tables in the code to figure out what size pipes to use for the drains and vents. As you can see above, the code dictates minimum pipe sizes and applies a number to each fixture called a drainage fixture unit value, which become important when you decide to combine drains and/or vents. The system would be pretty inefficient if every single fixture had it’s own independent drain and vent all running separately into the sewer or septic. The code allows you to use larger pipe sizes than the minimums and combine smaller pipes into bigger ones as long as the total DFU value in the pipe is below the maximum allowed for that particular pipe size.
Additionally, each fixture must have a trap, and the codes spell out what size trap must be used for each fixture. A trap is the u-shaped part of the pipe you may have seen under your sink, and is a monumentally important part of the DWV system. Without a trap, noxious fumes from the sewer or septic tank would be free to travel directly into your home. The trap holds a blockade of water in that u-shaped pipe and ensures that those fumes won’t enter the house.
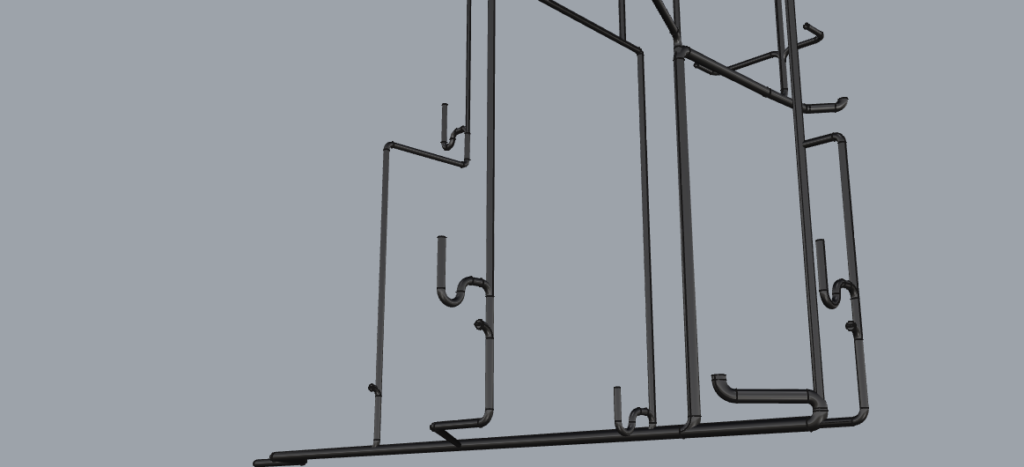
Armed with all of this knowledge, you are now prepared to grab a piece of paper and a pencil or a computer with CAD and plan out your very own DWV system. There is no wrong way to do it as long as you stay within the rules, but if you are wise about things you may be able to dramatically reduce the amount of piping that you need to buy and install. The best practice is to design the system before the framing has been started so that you can plumb in any hard to reach areas as I did before installing the subfloor.


Advice? Questions? I'd love to hear your feedback or help you out in any way I can!