↓ Skip to Main Content

Saving Sustainably

Main Navigation

  • Home
  • So What’s This All About?
  • Project Budget
  • Building Techniques Used
  • Check Out the Plans
  • Follow the Build
    • Step 1 – Buy Land
    • Step 2 – Site Preparation
    • Step 3 – Temporary Power Pole
      • 3a – Temp Power Pit and Utility Trench
      • 3b – Wiring and Inspection
    • Step 4 – Septic System
      • 4a – Dropping the Tank and Gravelless Chambers
      • 4b – Inside the Tank!
      • 4c – Ready For Another Inspection
      • 4d – Finishing the Septic Install
    • Step 5 – Get a Building Permit
      • 5a – Be Confident!
      • 5b – Overview of the Permitting Process
    • Step 6 – Dig and Prep for Foundation
      • 6a – Stakes and Steel
      • 6b – Square and Level Forms
      • 6c – Inner Forms, Plumbing and Bracing
      • 6d – Final Steps Before The First Pour
    • Step 7 – Pour Concrete!
      • 7a – Pull Stakes and Forms, Insulate, and Reinspect
      • 7b- Add Gravel, Vapor Barrier, and Rebar
      • 7c – Pour the Slab
    • Step 8 – Frame the First Floor
      • 8a – Utilize Advanced Framing Techniques
      • 8b – Frame the Interior Walls
      • 8c – Plumb and Line
    • Step 9 – Frame the Floor
      • 9a – Install Blocking and Plumbing
      • 9b – Install the Subfloor
    • Step 10 – Frame the Second Floor
    • Step 11 – Install the Roof
      • 11a – Frieze Blocks and Baffles
      • 11b – Lookouts and Fascia
      • 11c – Install Roof Sheathing
      • 11d – Inspection, Bargeboard, and Gable Overhangs
      • 11e – Drip Edge and Underlay
    • Step 12 – Wall Sheathing
    • Step 13 – The DWV
      • 13a – Install the Plumbing
      • 13b – Roof Vents and Pressure Test
    • Step 14 – Finish the Roof
    • Step 15 – Potable Water System
      • 15a – Install the Cold Water Supply
      • 15b – Install the Hot Water Supply
      • 15c – Install the Main Plumbing Supply
    • Step 16 - Complete "Dry-In"
      • 16a – Attach the WRB
      • 16b – Install the Windows
      • 16c – Sheathe/WRB the Gable Ends
      • 16d – Final Touches to Complete Dry-In
    • Step 17 – Electrical
      • 17a – Running Appliance and Receptacle Wiring
      • 17b – Wiring Lighting Circuits
      • 17c – Securing Wire and Making Up Boxes
      • 17d – Wiring the Panel
    • Step 18 – 2nd Story Walk Out Deck
      • 18a – Deck Ledger and Footing Forms
      • 18b – Complete the Deck Frame
    • Step 19 – Install the Ventilation System
      • 19a – Plan Out the Ductwork
      • 19b – Install the Ductwork
      • 19c – Exterior Ducting and Control Wiring
    • Step 20 – Install the French Doors
    • Step 21 – Install Exterior Siding
      • 21a – Install 4/4 HardieTrim
      • 21b – Install Rim Joist and Corner Trim
      • 21c – Install the Lap Siding
    • Step 22 – Air Sealing & Insulation
      • 22a – Complete the Conditioned Attic
      • 22b – Ceiling Drywall
      • 22c – Test the Air Sealing
      • 22d – Install Dense Pack Cellulose Insulation
      • 22e – Install Loose Fill Cellulose Insulation
    • Step 23 – Build Interior Finished Walls
      • 23a – Install Resilient Channel and Continuous Drywall
      • 23b – Complete Drywall Installation
      • 23c – Drywall Taping
      • 23d – Install Corner Beads and Second Coat
      • 23e – Apply Skim Coat, Primer, and Paint
    • Step 24 – Connect Utilities
    • Step 25- Install the Heating Appliances
      • 25a – Heat Pump Installation
      • 25b – Install the Heat Pump Water Heater
    • Step 26 – Build a Spiral Staircase
      • 26a – Build the Treads
      • 26b – Build the Railing
      • 26c – Complete Top Railing and Apply Clear Coat
  • About Me
  • Helpful Links
  • Contact Me

Saving Sustainably » Temporary Power

Tag: Temporary Power

Step 3b – Wiring and Inspection

By mbath Posted on May 2, 2017 Posted in Building Your Own Home, Do Your Own Electrical Work, Lot Improvement 2 Comments Tagged with Breaker Panel, Building Inspector, Grounding Rod, Meter Socket, Temporary Power, URD Cable
Step 3b – Wiring and Inspection

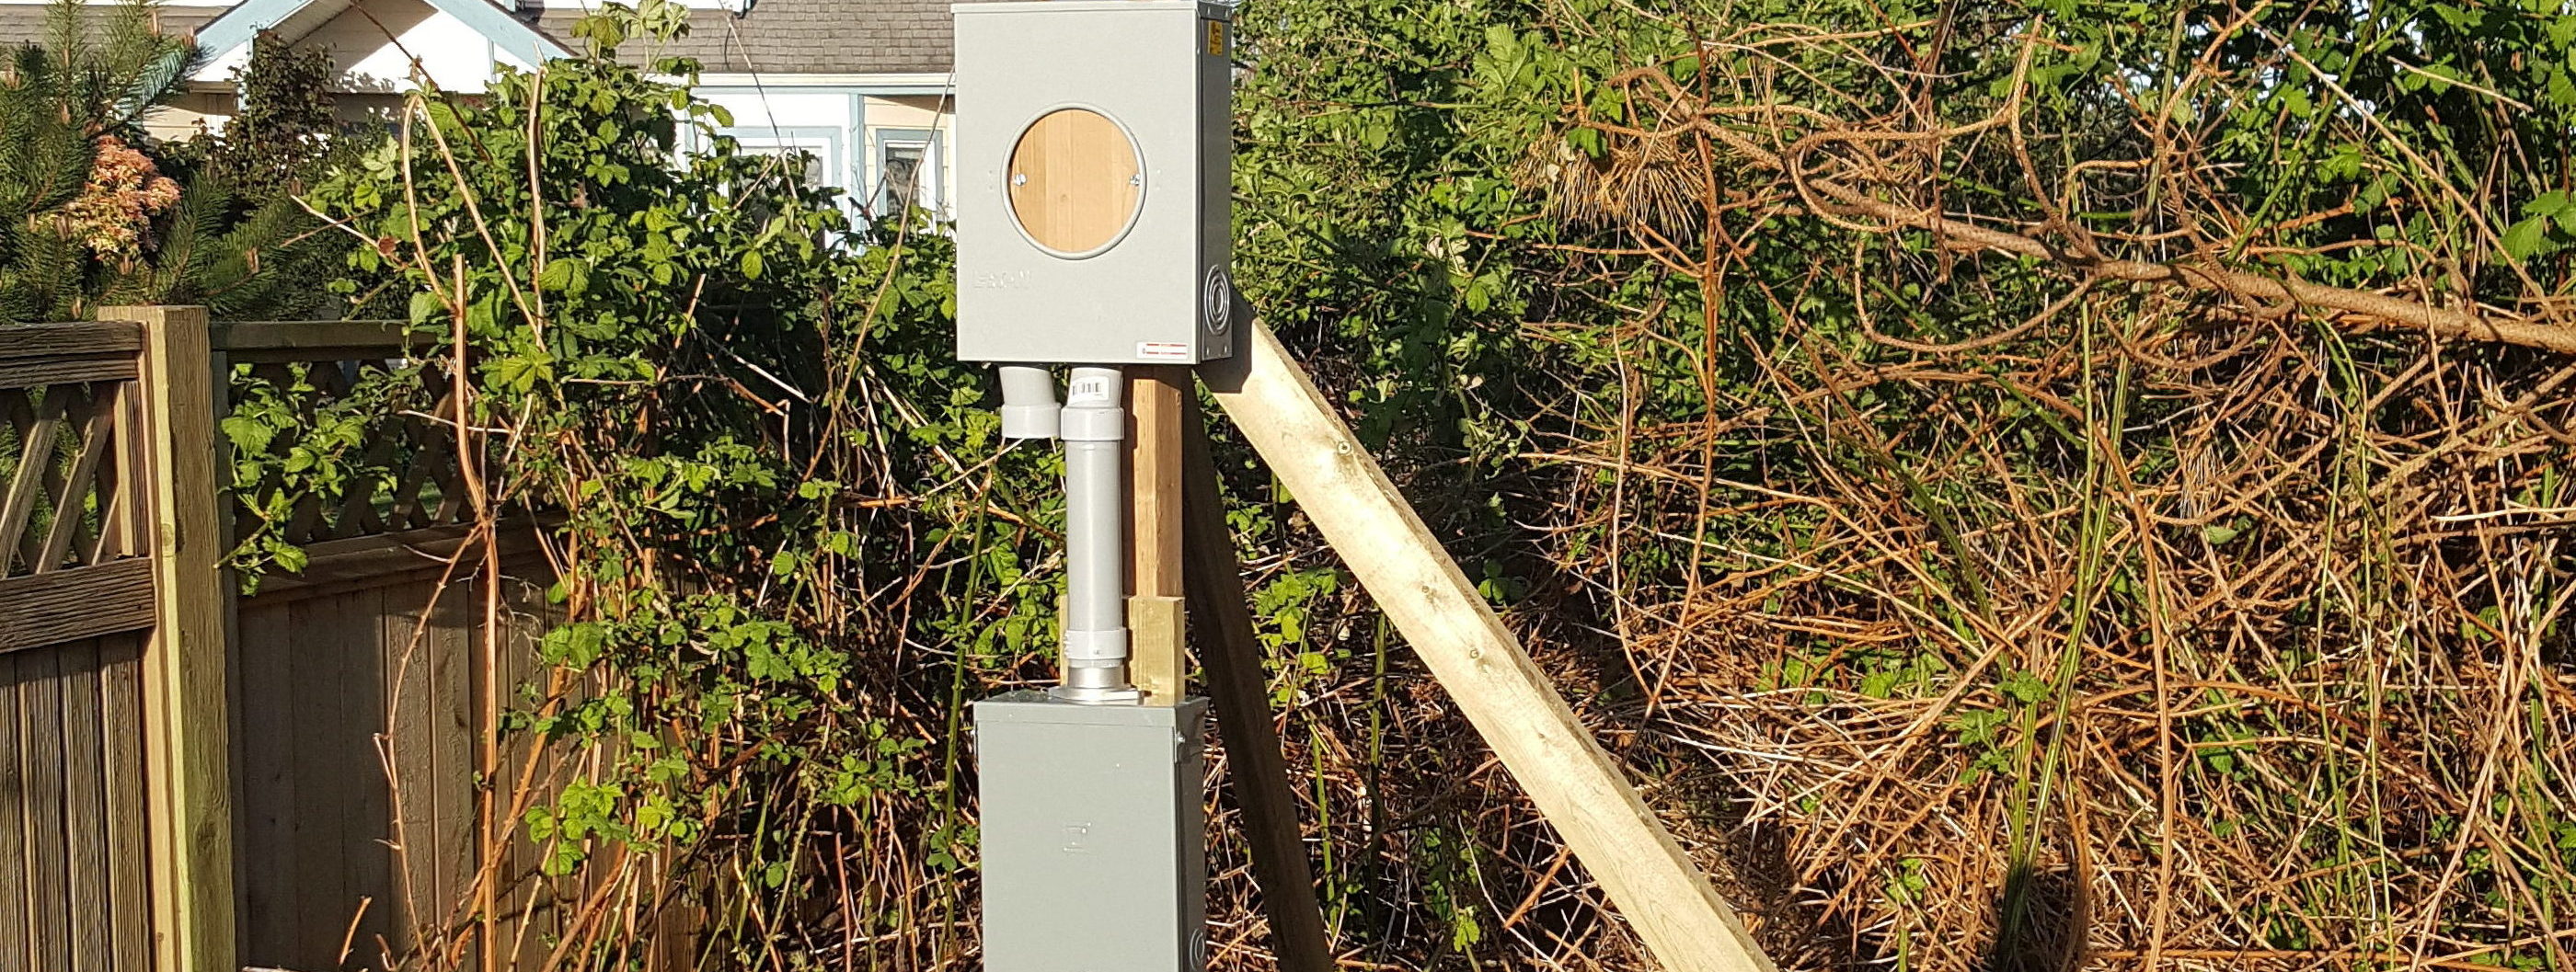
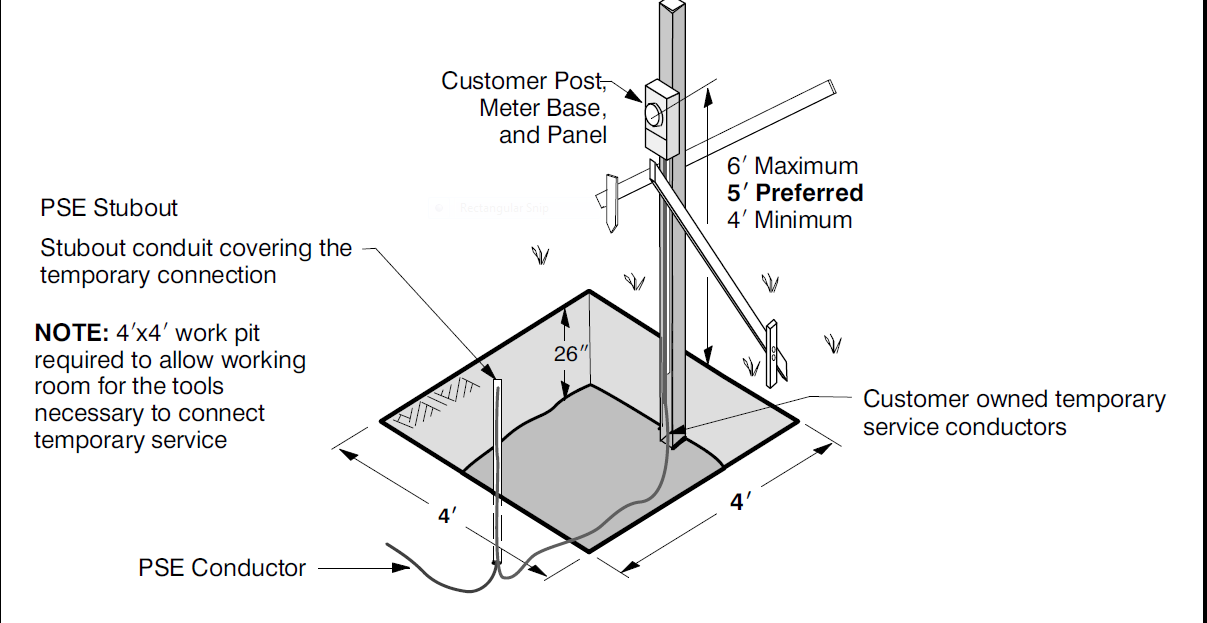
A temporary power pole can provide power to the tools required in building your own home. Here’s how to wire the circuitry.

Read more ›

Share this:

  • Facebook
  • Twitter
  • LinkedIn
  • Print
  • More
  • Reddit
  • Telegram
  • Pocket
  • Pinterest
  • Tumblr

Step 3a – Temp Power Pit and Utility Trench

By mbath Posted on April 28, 2017 Posted in Building Your Own Home, Do Your Own Electrical Work, Lot Improvement No Comments Tagged with Building Solo, Electrical Permit, Grounding Rod, Septic, Setbacks, Temporary Power
Step 3a – Temp Power Pit and Utility Trench

Learn how to get started on the temporary power and water hookups you will need to build your own home.

Read more ›

Share this:

  • Facebook
  • Twitter
  • LinkedIn
  • Print
  • More
  • Reddit
  • Telegram
  • Pocket
  • Pinterest
  • Tumblr

Step 3 – Temporary Power Pole

By mbath Posted on April 13, 2017 Posted in Building Your Own Home, Do Your Own Electrical Work, Lot Improvement 2 Comments Tagged with Electrical Permit, Grounding Rod, Lot, Temporary Power, Utilities
Step 3 – Temporary Power Pole

Building your own home requires temporary power. Learn the key steps in obtaining a temporary power pole from applying for a permit to constructing the power pole.

Read more ›

Share this:

  • Facebook
  • Twitter
  • LinkedIn
  • Print
  • More
  • Reddit
  • Telegram
  • Pocket
  • Pinterest
  • Tumblr

Follow the Build from the Beginning

  • Step 1 – Buy Land
  • Step 2 – Site Preparation
  • Step 3 – Temporary Power Pole
    • Step 3a – Temp Power Pit and Utility Trench
    • Step 3b – Wiring and Inspection
  • Step 4 – Septic System
    • Step 4a – Dropping the Tank and Gravelless Chambers
    • Step 4b – Inside the Tank!
    • Step 4c – Ready For Another Inspection
    • Step 4d – Finishing the Septic Install
  • Step 5 – Get a Building Permit
    • Step 5a – Stand Up!
    • Step 5b – Overview of the Permitting Process
  • Step 6 – Dig a Foundation
    • Step 6a – Stakes and Steel
    • Step 6b – Square and Level Forms
    • Step 6c – Inner Forms, Plumbing and Bracing
    • Step 6d – Final Steps Before The First Pour
  • Step 7 – Pour Footings and Prep for Slab
    • Step 7a – Pull Stakes and Forms, Insulate, and Reinspect
    • Step 7b- Add Gravel, Vapor Barrier, and Rebar
    • Step 7c – Pour the Slab
  • Step 8 – Frame the First Story
    • Step 8a – Frame the Interior Walls
    • Step 8b – Plumb and Line
  • Step 9 – Frame the Floor
    • Step 9a – Install Blocking and Plumbing
    • step 9b – Install the Subfloor
  • Step 10 – Frame the Second Story
  • Step 11 – Install the Roof
    • Step 11a – Frieze Blocks and Baffles
    • Step 11b – Lookouts and Fascia
    • Step 11c – Install Roof Sheathing
    • Step 11d – Inspection, Bargeboard, and Gable Overhangs
    • Step 11e – Drip Edge and Underlay
  • Step 12 – Wall Sheathing
  • Step 13 – The DWV
    • Step 13a – Install the Plumbing
    • Step 13b – Roof Vents and Pressure Test
  • Step 14 – Finish the Roof
  • Step 15 – Potable Water System
    • Step 15a – Install the Cold Water Supply
    • Step 15b – Install the Hot Water Supply
    • Step 15c – Install the Main Plumbing Supply
  • Step 16 – Complete “Dry-In”
    • Step 16a – Attach the WRB
    • Step 16b – Install the Windows
    • Step 16c – Sheathe/WRB the Gable Ends
    • Step 16d – Final Touches to Complete Dry-In
  • Step 17 – Electrical
    • Step 17a – Running Appliance and Receptacle Wiring
    • Step 17b – Wiring Lighting Circuits
    • Step 17c – Securing Wire and Making Up Boxes
    • Step 17d – Wiring the Panel
  • Step 18 – 2nd Story Walk Out Deck
    • Step 18a – Deck Ledger and Footing Forms
    • Step 18b – Complete the Deck Frame
  • Step 19 – Install the Ventilation System
    • Step 19a – Plan Out the Ductwork
    • Step 19b – Install the Ductwork
    • Step 19c – Exterior Ducting and Control Wiring
  • Step 20 – Install the French Doors
  • Step 21 – Install Exterior Siding
    • Step 21a – Install 4/4 HardieTrim
    • Step 21b – Install Rim Joist and Corner Trim
    • Step 21c – Install the Lap Siding
  • Step 22 – Air Sealing & Insulation
    • Step 22a – Complete the Conditioned Attic
    • Step 22b – Ceiling Drywall
    • Step 22c – Test the Air Sealing
    • Step 22d – Install Dense Pack Cellulose Insulation
    • Step 22e – Install Loose Fill Cellulose Insulation
  • Step 23 – Build Interior Finished Walls
    • Step 23a – Install Resilient Channel and Continuous Drywall
    • Step 23b – Complete Drywall Installation
    • Step 23c – Drywall Taping
    • Step 23d – Install Corner Beads and Second Coat
    • Step 23e – Apply Skim Coat, Primer, and Paint
  • Step 24 – Connect Utilities
  • Step 25- Install the Heating Appliances
    • Step 25a – Heat Pump Installation
    • Step 25b – Install the Heat Pump Water Heater
  • Step 26 – Build a Spiral Staircase
    • Step 26a – Build the Treads
    • Step 26b – Build the Railing
    • Step 26c – Complete Top Railing and Apply Clear Coat
  • Step 27 – Flooring

Subscribe to Blog via Email

Enter your email address to subscribe to this blog and receive notifications of new posts by email.

Join 134 other subscribers

© 2025 Saving Sustainably, LLC | Powered by Responsive Theme